Here are the KEY STEPS to successful Microgreen cultivation:
Before you start, we recommend that you Watch the 11 minute video on Student Farmers YouTube Channel “Student Farmers Microgreen Windowsill Grow Tips from Seed to Harvest October 26 2022” Direct link: https://youtu.be/-UiDopHchpY
Order your Equipment and Supplies (See our SHOP for recommendations.)
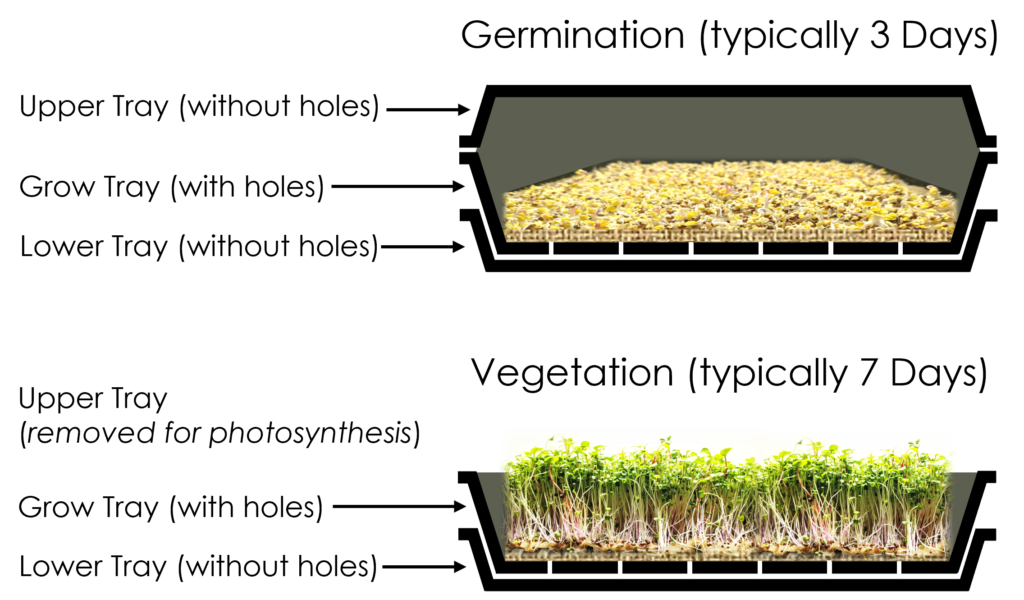
1. Sowing seeds: Scatter the seeds over a moist grow mat (e.g. hemp) in a double planter tray that has drainage holes in the upper tray and no-holes in the lower tray. This allows excess water in germination and vegetation to drain into the lower tray and prevent overwatering and mold. Spray the seeds with water from a misting sprayer and make sure not to have the sprayer head so close to the seeds that it moves them. Spray the underside of a third tray (no-holes) and turn it upside down to cover the seeds on the grow mat. This is important for the first three days, given that germination occurs in darkness. For a 10” x 20” tray you will typically need 1 oz of seeds, which is the equivalent of ¼” cup or about 8 to 10 teaspoons of seeds.
2. Germination: Place the tray setup in a cool dark place or at least a counter that is not near a sunny window. Lift the upper lid and mist the seeds on the grow matt with water twice daily for three days or until some of the stalks are 1” to 1.5” in height. Make sure to place the top tray back over the germinating seeds each day. If you do not mist the baby stalks you will start to see white fuzz. Do not be alarmed, because it is just root hairs and the water from the spray bottle will make them disappear. The baby stalks will look yellow given that they have not yet been exposed to sunlight or a grow light which turns them green though photosynthesis.
3. Vegetation: On day four remove the cover tray, and place the microgreens on or near a sunny windowsill (preferably facing south) or under a grow light. You can mist the microgreens once or twice daily but it is not required. What is required is watering the plants. At least once a day lift the edge of one of the short ends of the upper tray and pour ½ liter (approx 16 fluid ounces) of water into the lower tray, which is the one without the drainage holes. This will fill it up to between ¼” and ½” of water to help keep the roots and Grow Mat moist. You will see that the roots start to “reach” down from the upper to the lower tray to absorb the water. Check about 12 hours from when you added water to see if the lower tray is dry or near dry. If so, add another ½ liter, and typically do not add more than 1 full liter or 32 fluid ounces is any 24 hour period. The key is to keep the roots wet.
4. Harvest: After about 7 to 10 days from the time that the microgreens have been in the light, you will be ready to harvest when the greens are about 2” to 3” in height. To harvest, use scissors or shears to cut the microgreens at the base of their stalks near the top edge of the soil. If you do not eat the microgreens within 1 to 3 days of the harvest, then you will want to cut the Grow Mat vs the microgreens into sections that fit into a sealed container such as clamshell. They will last approximately one week, while refrigerated. Since you have not cut the microgreens they are technically still “living” so they are fresh up until the moment that you eat them. You can also cut and freeze microgreens in a freezer friendly bag or container if you do not expect to eat them all within a week.
Watch: 11 minute video on Student Farmers YouTube Channel https://studentfarmers.org/social-media/ “Student Farmers Microgreen Windowsill Grow Tips from Seed to Harvest October 26 2022”
Direct link: https://youtu.be/-UiDopHchpY
THREE PATHS to SUCCESS
Pick your Path (Beginner, Intermediate, Advanced). We have included the three most common scenarios on this page and links to more info for each.
To Get Growing, we have identified three paths to make it as easy as possible for fellow students to start cultivating microgreens.
It all starts with the right seeds, grow matts, and trays. Cultivation starts with seed Germination and then transitions quickly into Vegetation. The harvest follows the vegetation, where you get to eat what you and nature have created.
Three Paths:
System #1: Starter Set with Natural Light for One Grow Tray
This is an ideal way to begin growing microgreens. The key here is to have a window that faces south so that you can put the Grow Tray on the windowsill or a small table at the window take advantage of the free natural light from the sun year-round. To learn more about Equipment and Supplies click here for System #1.
Supplies needed:
1.Seeds
2.Grow Mat (hemp)
3.Spray Bottle
4.Scissors
5.Measuring Device (teaspoon or ¼ cup)
6.Tray with drainage holes
7.Tray without holes
8.Tray without holes (cover for germination)
9.Container for refrigeration (eco-plastic)
10.Stickers for labels
11.BONUS: Tenacity
For daily watering just use any cup that holds 16 oz or ½ liter
INTERMEDIATE
System #2: Starter Set with LED Light for One Grow Tray
This is the best path for growers who want to get started but do not have a window facing south at their residence. To learn more about Equipment and Supplies click here for System #2.
System #3: Advanced Rack Set with larger LED Light for Three Grow Trays
This is the best path for growers who want to produce 24 containers of microgreens each week and share them with family, friends, or sell them to local restaurants, fitness centers for smoothies, etc. To learn more about Equipment and Supplies click here for System #3.